You haven't signed in yet, you can have a better experience after signing in

{{ item.spec_option }}
{{ item.spec }}
System
¥{{ random.sku_info.price }}
Reference price
How TextSeek Works
Efficient and precise search
Full text search for each Chinese and English character
When Windows' default search takes a long time to search and ultimately tells you that it was not found, or even some files are not found right under your nose, it often makes people very angry. By introducing advanced technology, TextSeek can solve such problems. It uses full text scanning technology to find all the text (not lost due to segmentation errors) and displays search results like Baidu. The software has good support for Chinese, and the interface supports 14 languages including Chinese, English, Japanese, Korean, French, German, Arabic, etc.
Support for various documents
Searchable file names and specific content
TextSeek supports multiple document formats, including Word, Excel, Powerpoint, PDF, WPS, OFD, and more. All format parsing is integrated into TextSeek, without the need to install additional packages. Unlike other desktop search tools, the file name of the document and all text content are integrated into the search engine to avoid text omissions.
Ultimate search experience
Customize search scope
In TextSeek, you can specify directories to be indexed to speed up searches (in regional mode), or search directly without indexes (in simple mode). In addition, TextSeek provides four sorting methods and multiple filters to improve search accuracy, and also supports quick browsing of search results through shortcuts. Its functions also include regular expression search, keyword highlighted summaries, and previews, which are beneficial for users to more efficiently locate the desired text.
{{ app.qa.openQa.Q.title }}
TextCeek - Advanced Features Guide for macOS Version?
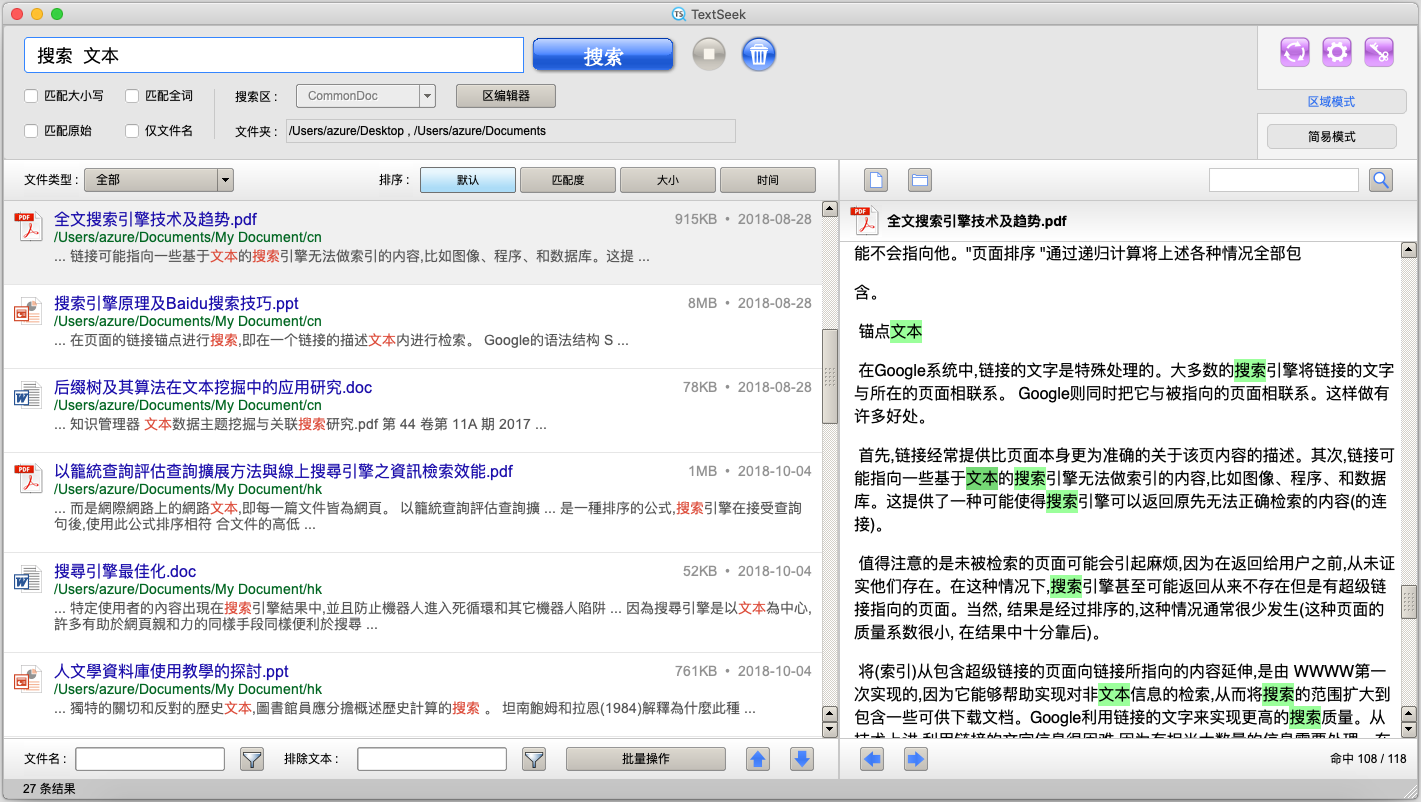
In the advanced search guide, it mainly introduces the configuration of the area (area mode) and software settings. Let's first take a look at the interface of the regional mode.
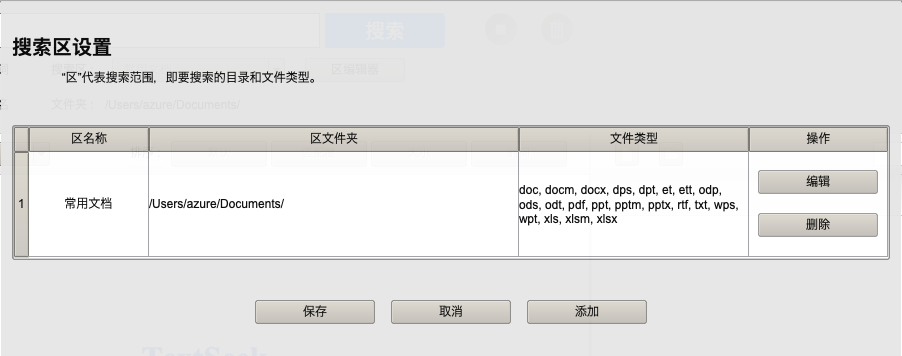
In zone mode, a button for the "Zone Editor" has been added. Open the 'Zone Editor', and all information about the zones will be displayed in the table, with one row representing one zone (the default row is the zone you set in the wizard page). You can click 'Edit' to modify the area, or click 'Add' to add a new area. After setting up the area, click 'Save' to perform a scan of the area.
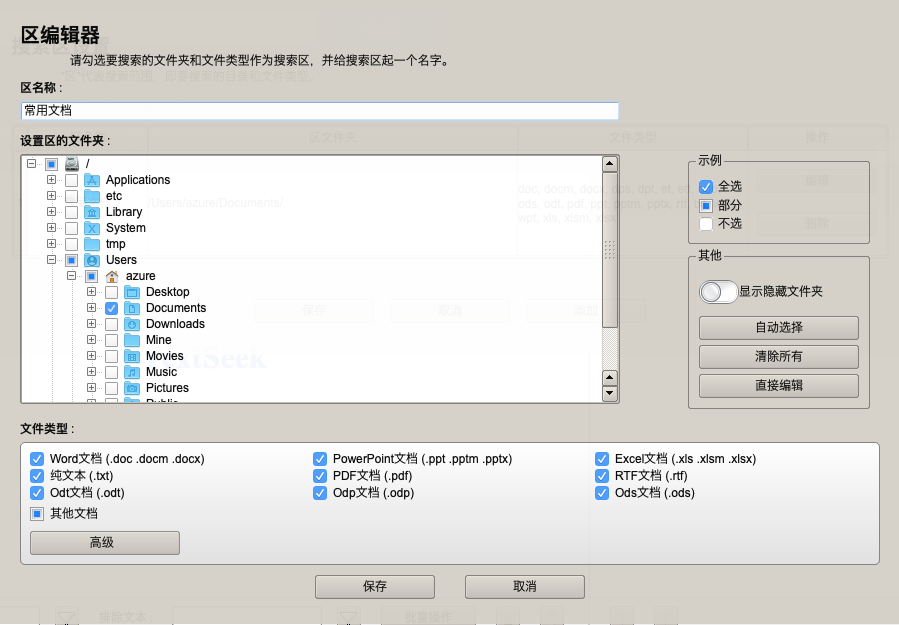
This is the settings page for a single zone. You can specify the area name, check the folder and file type to search for (you can click on "Show hidden folders" on the right to display all folders). Multiple folders can be selected here, and there is an "Auto Select" button on the right that can also help you intelligently select some commonly used folders. If the file type you need is not in the list, please click 'Advanced' to proceed further.
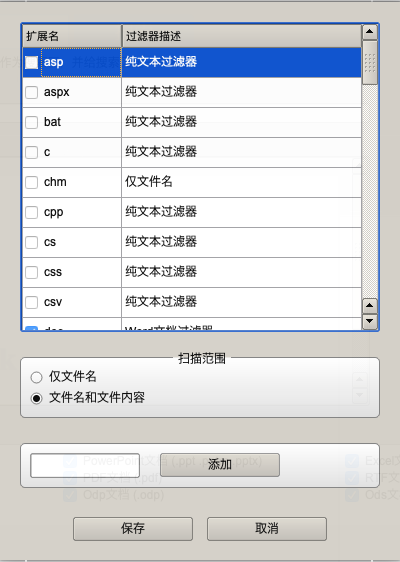
Next, we will introduce the advanced settings page for file types. The table above is a file suffix table, with one row representing a file suffix. Click on a line to select the scanning range as' file name only 'or' file name and file content '. Below, you can add a new file suffix by simply entering the file suffix and pressing the 'Add' button. Files of user added types will be parsed as plain text files. Click 'Save' to keep all changes.
There are three buttons in the upper right corner of the main interface, which are used for "Quick Scan", "Settings", and "Registration". Among them, "quick scan" is only applicable to regional mode. If you haven't opened TextCeek for a long time, the previously pre scanned content may have expired. Click this button to quickly scan it again.
This is the 'Settings' window. The first tab is "General Settings", where you can set the display language and default encoding (for parsing text files with difficult to detect encoding). Below, you can set the highlight color of the preview window. At the bottom of the window, you can change the font type and size of the preview window.
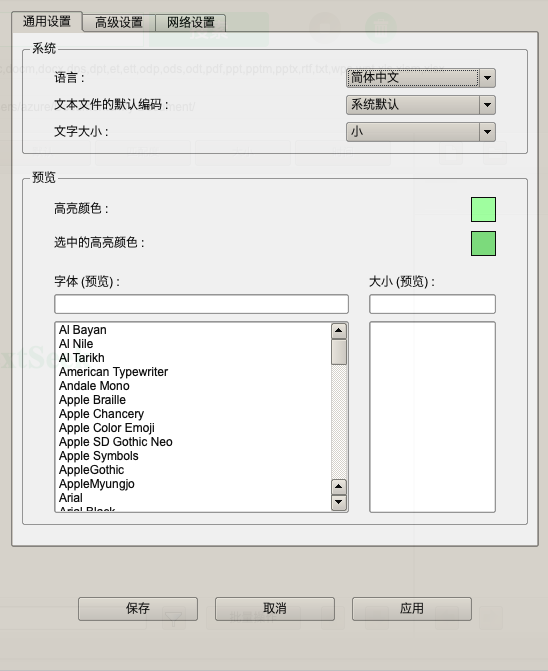
The second tab is "Advanced Settings".
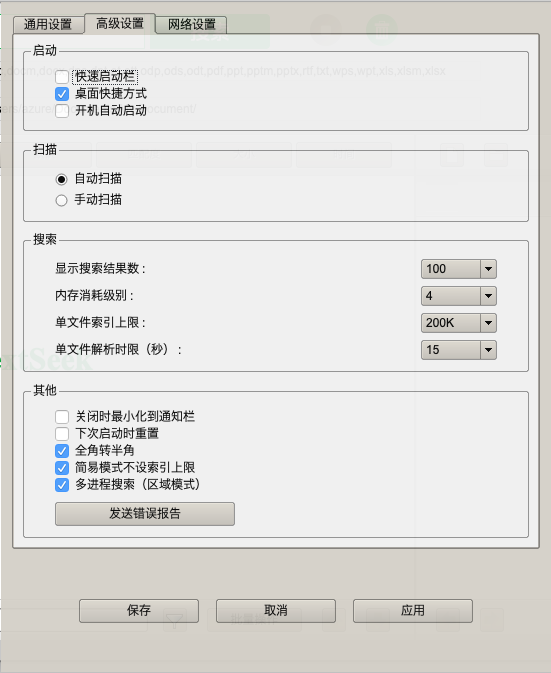
In the "Startup" section, you can trigger TextCeek using desktop shortcuts, quick launch, right-click menu, or auto launch;
In the "Scan" section, you can decide whether the file content is updated automatically or manually;
In the "Search" section, you can:
(1) Set the number of results on the search results page;
(2) Set the memory consumption level (higher means more memory consumption but faster search speed);
(3) Set a single file index limit (higher means support for larger documents but slower search speed);
(4) Set the maximum parsing time for a single file (higher means support for more complex documents but slower scanning speed);
In the "Other" section, you can:
(1) Set whether to minimize to the tray after clicking the close button;
(2) Reset the settings, and TextCeek will roll back to its initial startup state on the next startup;
(3) Set whether to force full angle to half angle (useful for some languages);
(4) Is there a single file index upper limit for setting the simple mode? By default, there is no upper limit to avoid omissions;
(5) Whether to use multi process search in regional mode;
5. Finally, there is the "Send Error Report" button. When you encounter a TextCeek crash, click on it to send us an error report, which will help us identify the root cause of the crash.
The syntax of regular expressions
To search for regular expressions, you need to start the search box with the keyword're: '. For example, you can enter "re: \ w+@ 163. com" to match all 163 email addresses, or you can enter "re: 1 \ d {10}" to match all phone numbers. The regular expression syntax of TextCeek is consistent with Python, as follows:
[] -- Used to match a specified character category, where words starting with ^ represent the inverse set
Match any character except for line breaks
Repeat the previous character from 0 to 1 times
*Repeat the previous character from 0 to infinity times
+Repeat the previous character 1 to infinity times
{m} Repeat the previous character m times
{m, n} -- Repeat the previous character m to n times
\D - Match numbers, equivalent to [0-9]
\D - Match any non numeric character, equivalent to [^ 0-9]
\S - Match any whitespace symbol
\S - Match any non blank character
\W - Match any alphanumeric character, equivalent to [a-zA-Z0-9_]
\W - Match any non alphanumeric character, equivalent to [^ a-zA-Z0-9_]
|---- Branch, choose one more option
() - Extract tuples. If a tuple is found, TextCeek will hit the first tuple
\X - escape character, used to match special characters such as \ \, \ [, \], \?, \ *, \+, \N, \ uAB34, etc


Bargaining


